Presentation Graphics: Printing
(Handouts, Overheads, and Presenter Notes)
Microsoft PowerPoint
(Office XP/2002)
The following is designed to be used as a tutorial. You can
work through this tutorial using multi-tasking
(i.e. switching back and forth between your web browser and Microsoft PowerPoint),
or you can print this web page and just work in your slide show.
This tutorial will introduce you the three primary printing options available
for your slide show. You should try to DO each of the processes described
here (more than once) and also do a little experimenting on your own.
Contact your instructor if you have any questions.
Before you begin, open the slide show you saved at the end
of the last tutorial. If you didn't save it, create a new slide
show with at least 4 slides.
Introduction
There are several printing options available in PowerPoint.
The three most common include:
- Handouts - several (usually 3, 6, or 9) small versions of the slides per
page that are used as audience handouts
- Overheads - one slide per page (use an overhead transparency
if your printer accepts them, otherwise print to paper and use
a copy machine to create the overhead transparency)
- Presenter Notes - one slide per page with a text box below
that is used to type up notes to be used by the presenter
Creating Handouts
When a slide show is used as a visual aid in giving a presentation to an audience,
it is often beneficial to create handouts for the audience that includes the
slides. This way the audience doesn't need to take as many notes and can focus
their attention on the presentation. When printing these handouts, you do not
want to print each slide on a separate piece of paper. Therefore, PowerPoint
gives you sevaral options for printing small versions of the slides (usually
3 or 6 slides per page), as shown in the following diagrams.
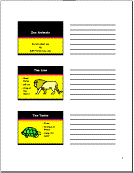
|
3 Slides per Page |
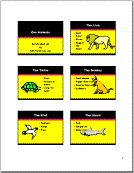
6 Slides per Page |
 |
 |
Advantage: Gives the audience
more space for taking notes. |
Advantage: Uses half as much paper.
Note: You can also print 9 slides per page, but with this option
the images, and therefore the text, gets pretty small.
|
To create these handouts:
- From the "File" menu, choose the "Print..." command
(NOTE: Do NOT use the "Print" button on the standard toolbar. This
button will print in a default format, not allowing you to specify how you
want the slides printed.)
- In the "Print what:" popup menu located in the lower-left portion
of the print dialog box, choose "Handouts."
- To the right, in the "Handouts" area, specify how many slides
are to be printed on each page.
- OPTION: The "Color/grayscale" popup menu can be used to save ink.
The three options here include:
- Color - Prints the slides using all of the colors (assuming you are using
a color printer ... uses a LOT of ink).
- Grayscale - Uses shades of gray (saves your color ink).
- Pure Black and White - Graphics will use grayscale, text will be black,
and everything else will be white (saves more ink and is sometimes more
readable than the grayscale option).
- Change any other printing settings as needed.
- Click on the "OK" button.
NOTE: The option in step four above (printing in shades of gray or pure black
and white instead of color) is normally used because these printouts will most
likely be duplicated on a copy machine that does not do color.
Creating Overheads
When a computer will not be available at the location where
the presentation is to be given, PowerPoint is used to create
overhead transparencies. To print directly on overhead transparency
film, remember the following:
- Laser Printers: Most laser printers can print directly on
regular overhead transparencies.
- Ink Jet Printers: These printers can NOT print directly on
regular overhead transparencies because they are non-porous,
but you can purchase special overhead transparency film for ink
jet printers (a bit more expensive). A less expensive option
is to print the slides on paper and then use a copy machine to
copy the slides on to the overhead transparencies.
Another consideration with overhead transparencies is your
choice of a color scheme. Most slides that are to be presented
with a computer will use darker background colors and light text
colors. For overhead transparencies, you will use light colors
with a white background and dark text.
NOTE: As you try this, just print one or more slides on
paper.
To create overheads:
- From the "File" menu, choose the "Print"
command (NOTE: Do NOT use the "Print" button on the
standard toolbar. This button will print in a default format,
not allowing you to specify how you want the slides printed.)
- In the "Print what:" popup menu located in the lower-left portion
of the print dialog box, choose "Slides."
- OPTION: As mentioned above, you can also specify color, grayscale, or pure
black and white printouts.
- Change any other printing settings as needed.
- Click on the "OK" button.
Creating and Printing Presenter Notes
"Presenter Notes" are printed pages of the slides (one page per slide)
that contain a small copy of each slide followed by notes for that slide the
presenter will use as they give the presentation.
The default layout for these notes pages will use the top half of the page
for the slide and the lower half for notes. This tends to waste a lot of space
that could be used for notes. Therefore, the first thing you might want to do
before creating these notes is to modify the "Notes Master," which
determines this layout.
- From the "View" menu, choose the "Master" submenu, and
then choose the "Notes Master" command. You will see a layout that
looks like the following:
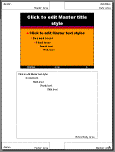
- Click on the graphic of the slide (handles will appear) and then use one
of the corner handles to make the slide graphic smaller (about half of the
original is recommended). NOTE: If you hold down the shift key while dragging
the corner handle, the slide will keep its original aspect ratio (i.e. it
won't get distorted).
- Drag on the center of the graphic of the slide to move it to the upper left
region of the layout.
- Click on the "Notes Body Area" text box, and then drag on the
handles to make this area fill the area below the slide graphic.
- OPTION: Select the text in the "Notes Body Area" and change the
font size as desired.
- The layout should now look like the following:

- Close the notes master view (there should be a little palette on the screen
that has a button on it that says "Close Master View"). You can
also close the notes master view by selecting the "Normal" command
from the "View" menu.
In the normal view, you will notice a small text box just below each
slide that says, "Click to add notes." This is where you type the
presenter notes for each slide. This text box can be make larger by dragging
on the divider between the notes area and the slide area. Create some notes
for each of your slides.
Printing the notes pages is similar to printing overhead
transparencies.
- From the "File" menu, choose the "Print" command (NOTE:
Do NOT use the "Print" button on the standard toolbar. This button
will print in a default format, not allowing you to specify how you want the
slides printed.)
- In the "Print what:" popup menu located in the lower-left portion
of the print dialog box, choose "Notes Pages."
- OPTION: As mentioned above, you can also specify color, grayscale, or pure
black and white printouts.
- Change any other printing settings as needed.
- Click on the "OK" button.
NOTE: Try each of these printing options. If you want to save paper but also
see the affect of each of these commands, use the "Preview" button
at the lower-left corner of the print dialog box.
Where to go from here...
If you understand the above concepts, you are ready to go to the next tutorial (Presentation Graphics: Running
the Slide Show - Presenter Controlled and Self-Running). After the completion
of all of the tutorials on Presentation Graphics, you will be ready to start
working on the two Presentation Graphics projects.
[an error occurred while processing the directive]